Upload Source Data
The Upload Source Data feature allows Data Administrators to upload source system data into CryspIQ® for processing.
Before data can be uploaded, CryspIQ® requires:
- A Source Message defining the expected structure of the incoming data.
- A Message Map defining how the source data will be transformed into the CryspIQ® enterprise data model.
Once validation is successful, CryspIQ® converts the uploaded CSV file into an XML message and automatically places it into the Mapper processing location.
Overview
Source data uploads follow a controlled process to ensure only valid and mappable data enters CryspIQ®.
The upload workflow is:
CSV File Upload
       ↓
Validate Source Message Exists
       ↓
Validate Message Map Exists
       ↓
Convert CSV to XML
       ↓
Drop XML into Mapper Location
       ↓
Mapper Processing
       ↓
Load Processing
       ↓
Data Available in CryspIQ®
Before You Start
Before uploading data, ensure:
- You have Data Administrator access.
- A Source Message has been created.
- A Message Map has been configured.
- The CSV file matches the Source Message structure.
- The CSV file contains valid source data.
The uploaded file must match the Source Message definition already configured within CryspIQ®.
Validation Checks
CryspIQ® performs two validation checks before accepting the upload.
Validation 1 – Source Message Exists
CryspIQ® checks that a Source Message has been defined.
The Source Message tells CryspIQ® what structure is expected from the source system.
If the Source Message does not exist:
Upload Rejected
Source Message Not Found
The upload will not proceed.
Validation 2 – Message Map Exists
CryspIQ® then checks that an active Message Map exists.
The Message Map defines how the source fields are transformed into CryspIQ® business context.
If a mapping does not exist:
Upload Rejected
No Active Mapping Found
The upload will not proceed.
A Source Message without an active Message Map cannot be processed.
Navigate to Upload Source Data
From the main menu navigate to:
Sources → Upload Source Data
The Upload Source Data page allows administrators to upload CSV files for processing.
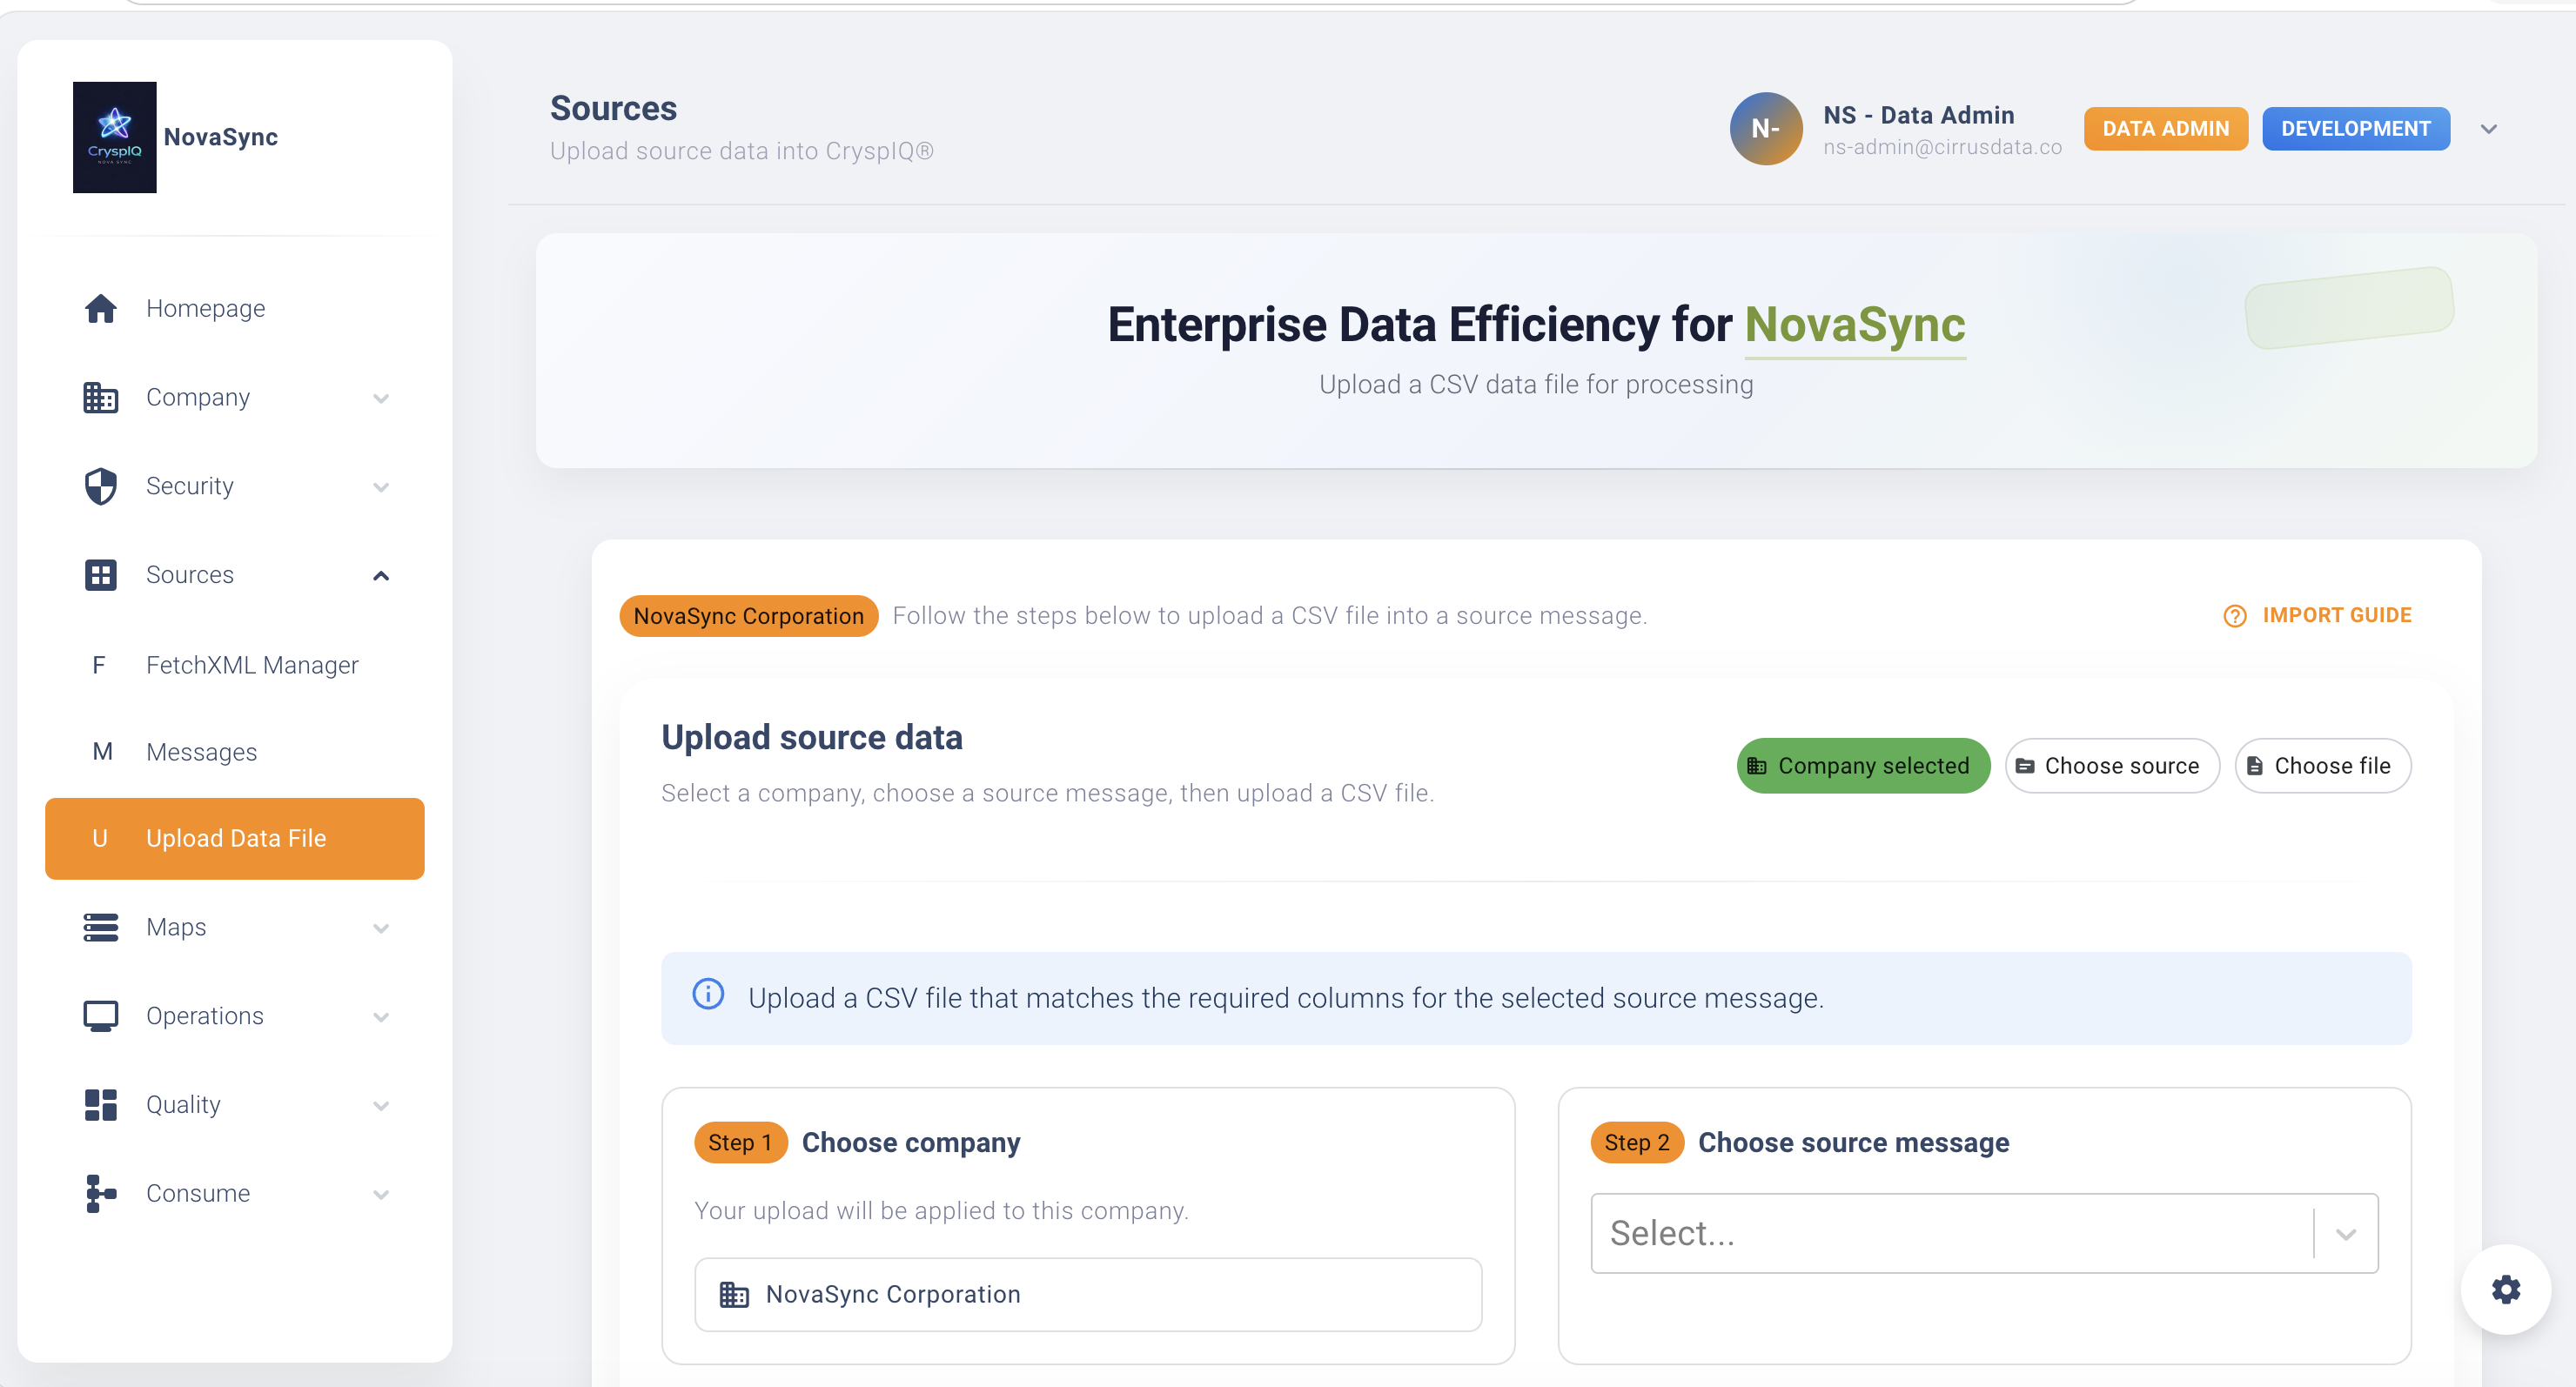
Upload a CSV File
- Open Sources → Upload Source Data.
- Select the Source Message.
- Browse and select the CSV file.
- Review the selected file.
- Select Upload.
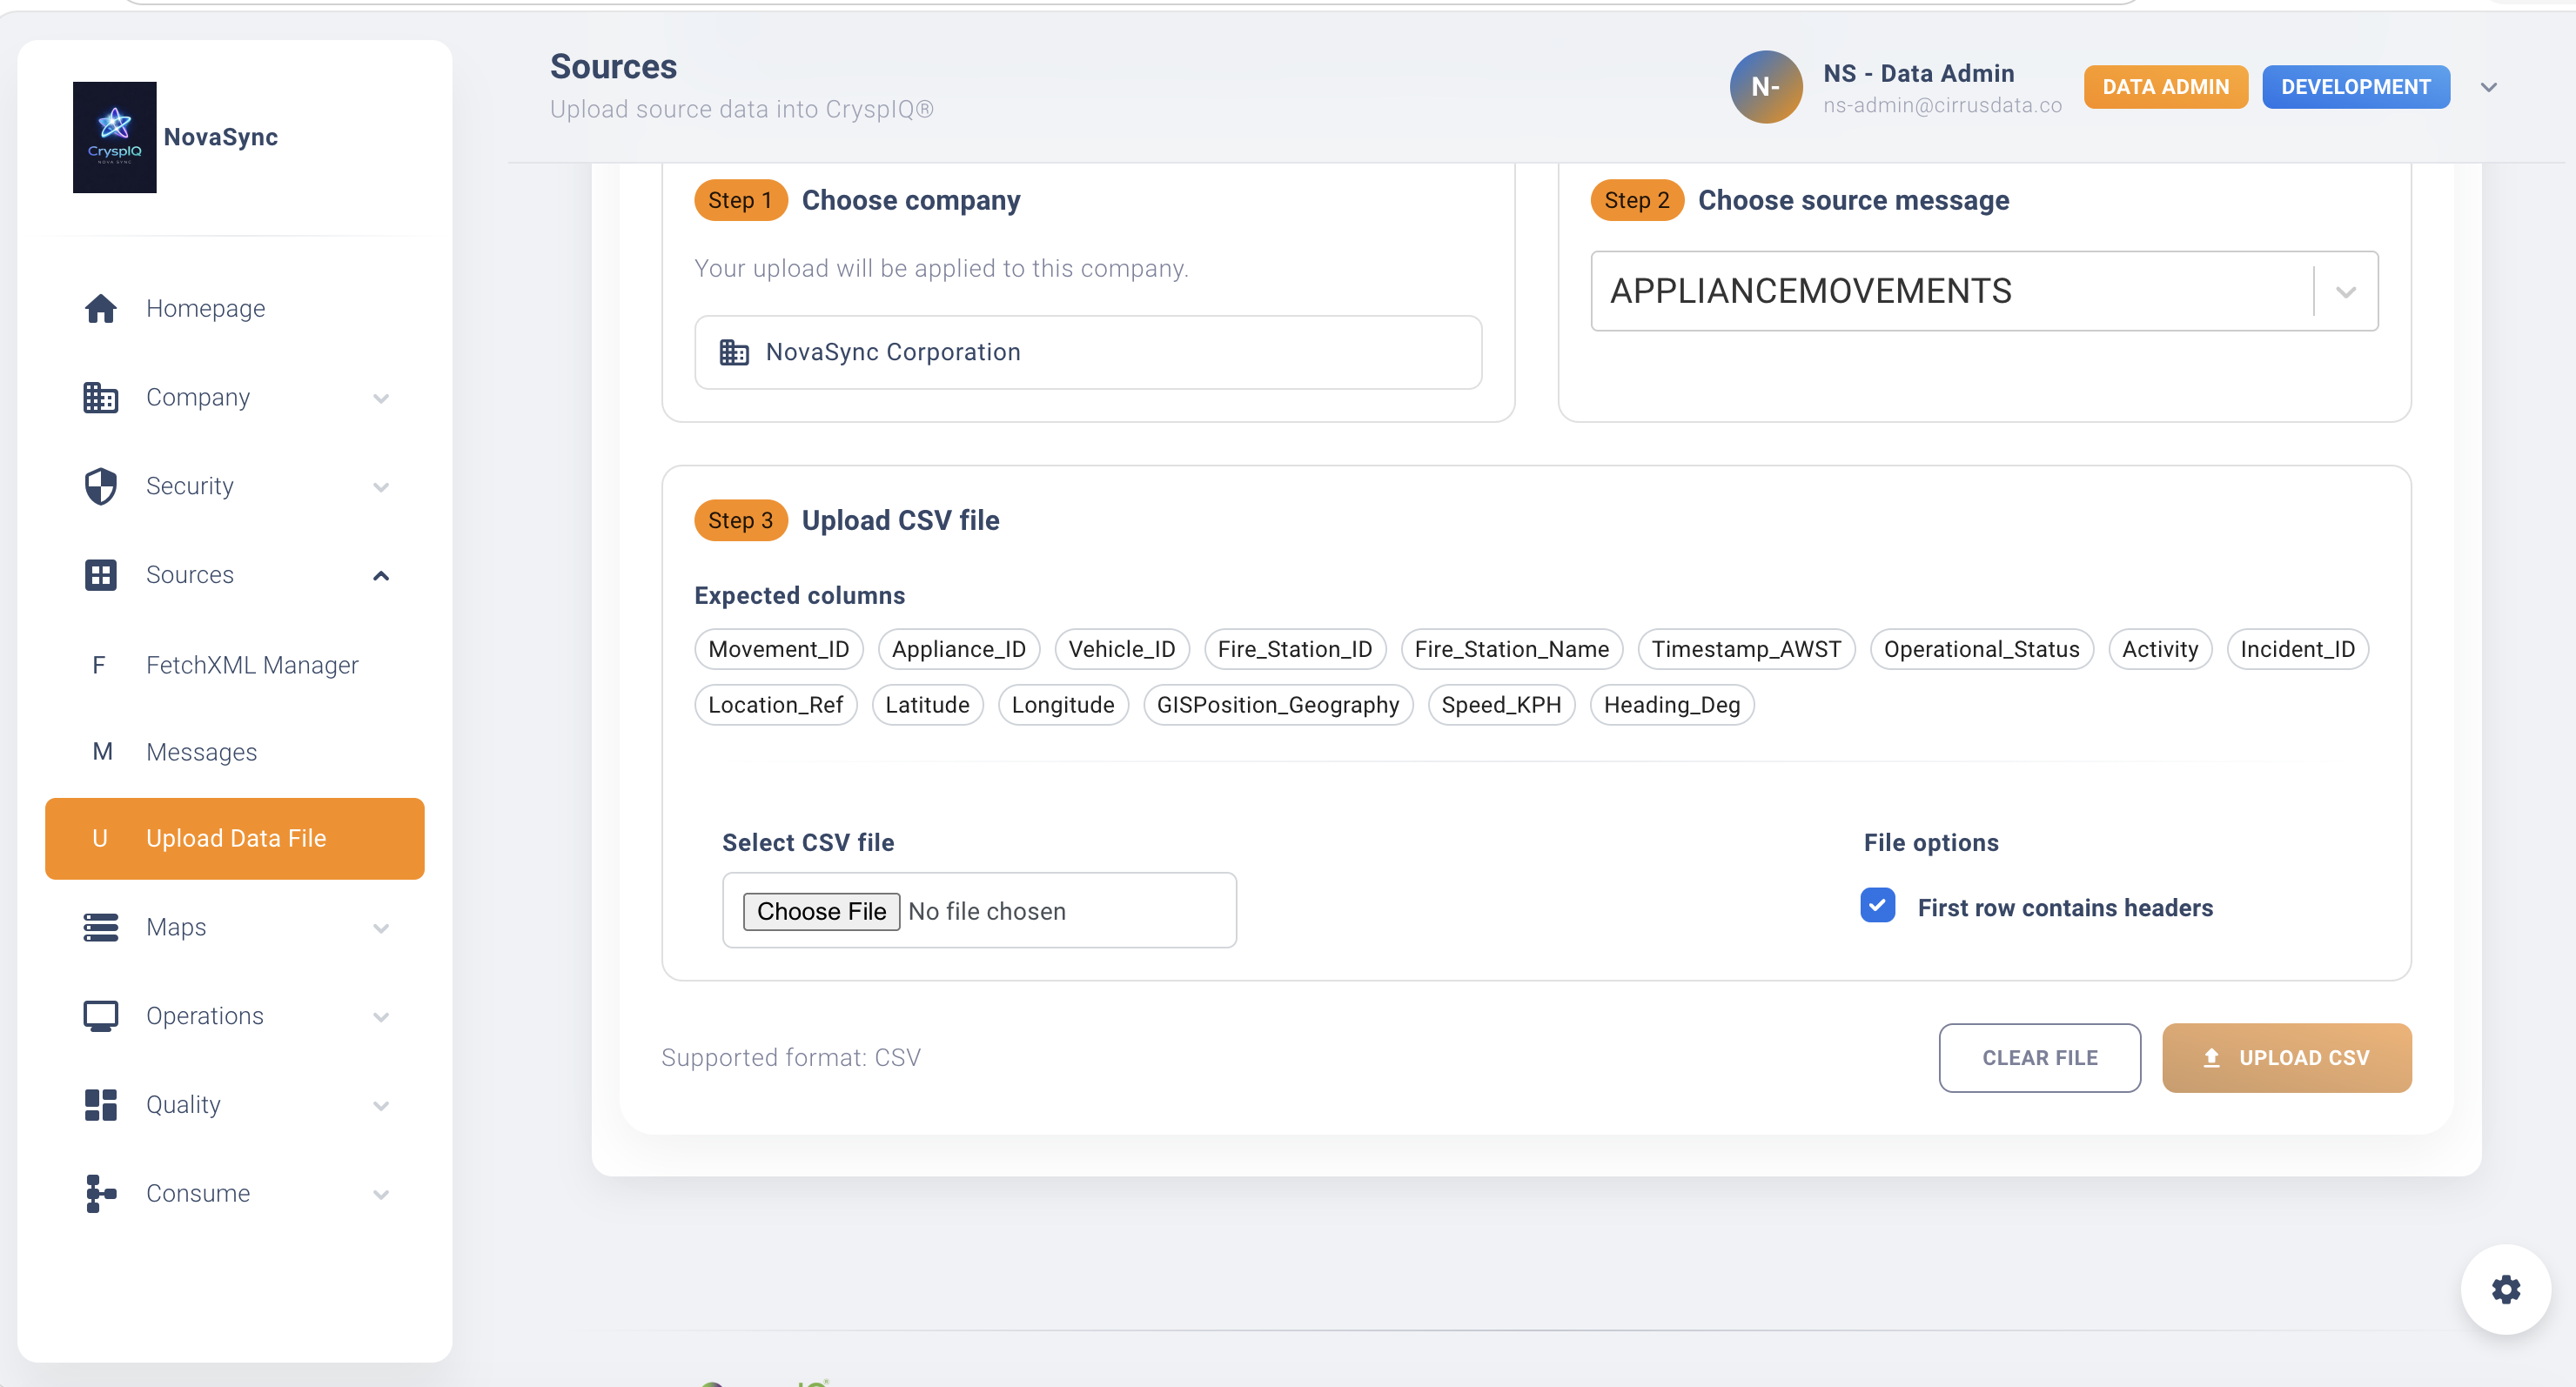
CryspIQ® automatically performs validation before accepting the file.
Successful Upload
When validation succeeds:
- The CSV file is accepted.
- The data is converted into XML.
- The XML file is written to the Mapper processing location.
- Mapper processing begins automatically.
Example:
Payroll_Employees.csv
        ↓
Payroll_Employees.xml
        ↓
Mapper Processing Queue
What Happens Next?
Mapper Processing
The Mapper service:
- Reads the XML file.
- Applies the configured mapping.
- Executes methods and defaults.
- Enriches the data with business context.
- Produces CryspIQ® target messages.
Load Processing
The Load service:
- Reads the mapped target messages.
- Loads the data into the CryspIQ® enterprise data model.
- Applies security controls.
- Applies quality controls.
- Makes the data available for reporting and analytics.
Example Upload
A Data Administrator receives:
Payroll_Employees.csv
The file contains:
EmployeeId,EmployeeName,Department,Salary,StartDate
CryspIQ® performs the following validation:
Source Message Check
Payroll_Employees
✓ Found
Message Map Check
Payroll_Employees_Map
✓ Found
The file is converted into:
Payroll_Employees.xml
and automatically placed into the Mapper processing folder.
File Structure Requirements
The uploaded file must:
- Be in CSV format.
- Match the Source Message structure.
- Include a header row.
- Use the expected delimiter.
- Contain valid data values.
Example:
EmployeeId,EmployeeName,Department,Salary
1001,John Smith,Finance,85000
1002,Jane Brown,Operations,92000
Monitoring Processing
After uploading the file, processing can be monitored through:
Operations → Mapper Operations
and
Operations → Load Operations
These screens allow administrators to:
- Monitor processing status.
- Review processing history.
- Investigate failures.
- Review record counts.
- View processing logs.
Common Errors
Source Message Not Found
Cause:
No Source Message Exists
Resolution:
- Create the Source Message.
- Verify the correct Source Message has been selected.
- Re-upload the file.
Message Map Not Found
Cause:
No Active Mapping Exists
Resolution:
- Create a Message Map.
- Ensure the map is active.
- Re-upload the file.
Invalid File Structure
Cause:
CSV Structure Does Not Match Source Message
Resolution:
- Review the Source Message definition.
- Compare column names.
- Correct the CSV file.
- Re-upload.
Processing Failure
Cause:
Mapper or Load Validation Failure
Resolution:
- Review Mapper Operations logs.
- Review Load Operations logs.
- Correct the issue.
- Re-upload the file.
Best Practices
Create Source Messages First
Always define Source Messages before attempting uploads.
Create and Test Message Maps
Ensure mappings have been tested before loading production data.
Use Consistent File Structures
Avoid changing source column names once Source Messages and Maps have been established.
Validate Files Before Uploading
Check:
- Column names
- Required fields
- Data quality
- Record counts
before uploading.
Monitor Processing
Review Mapper and Load Operations after every upload.
This ensures any issues are identified early.
Related Guides
Next Steps
After successfully uploading source data:
- Monitor Mapper processing.
- Monitor Load processing.
- Review Data Quality dashboards.
- Validate loaded data using the Query Library or Query Tool.
CryspIQ® automatically applies mappings, governance, security and quality controls throughout the processing pipeline to ensure trusted enterprise data is delivered to users.